Friday, 25 November 2011

Wood Workshop

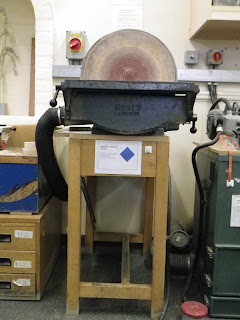
In this workshop, we were put into small groups and given a woodwork machine to simplify and replicate to 1/6 scale. I was a bit unsure as to how this workshop was going to pan out, as I don't really enjoy group work. But once I got into the work we had been given, it wasn't all that bad. my group was given the sanding machine.


So we measure all the different aspects of the machine and then divided each figure by 6 to get the scaled down measurements. Here are the diagrams we used to help work out the dimensions.


Then we collected some scrap wood and drew out all the pieces. We then cut them out and sanded them. The two round shapes on the machine were quite tricky but I think we handled them quite well. We then glued all the pieces together and added some thick aluminium wire for two of the pipes on the machine for a final finishing touch.


I then took it home to paint it. Unfortunately, some of the pieces came off while I was transporting it home so I had to stick it back together again. I painted it using a red-brown colour for the sanding disk and a black-grey colour for the metal part of the machine. I decided to leave the large supporting block unpainted because the actual table the machine was on was made of wood. I only used these two colours to keep it minimal, in line with the simple geometric shapes we used to represent each part of the machine.


I'm really pleased with the way this model turned out and I think it was a good effort from me and my group. I think I did a good job on getting the paint colours right and painted it neatly too. I will definitely be more comfortable using all the woodwork machine now if a project that I'm working on requires me to use them.

Textiles Workshop

In this workshop we were given three huge piles of scrap fabrics to go through and make something that was supported by the body. I was really looking forward to this workshop as I have had much chance to use my skills in this particular area. I decided to make a shoulder piece. I started off my covering a few pieces of foam padding and shoulder pads with different fabrics and then arranged them on a large loop of elastic and  fake-leather base. I then kept adding various triangles of fabric to build up the structure of the piece and then photographed my progress in the photography scoop.


I also took a few pieces of scrap fabric home with me in order to finish it off completely.


I really enjoyed this workshop and although it doesn't relate to any of my current projects I will definitely keep this idea in mind for future projects.

Sunday, 13 November 2011

S M L XL Project Development

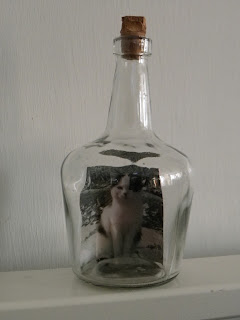
I had gotten a little stuck with my idea for this project so I completed a brainstorm to try and work out my ideas a little better and to display my idea for the group critique. I also put some images into my four bottles, and took the bottles with me to display the idea.


I was working around my idea of presenting animals in the bottles. But they would be in the wrong bottles, so the smallest animal would be in the biggest bottle etc. I was really struggling with how I would get the images/models into the bottles as they have very small bottle necks and I didn't really want to start cutting the bottles up in case they broke. My tutor said the paper images inside the bottles would be an inadequate way of presenting the final piece, and also the idea was a little too obvious. He suggested going in different direction of putting the same thing in each bottle to show the size of the 'thing' in contrast to the size of the bottle. He first suggested a length of thread or string. It would look very different bunched up in the crowded little bottle than in the sparse and spacious big bottle. I like this idea and am currently looking into different things that I can put into the bottles. He also liked my balloon idea from my brainstorm page, and how I could put a little illustration on each balloon and put it into each bottle, perhaps blowing it up perhaps not.

So I am in the process of acquiring different materials to put into the bottle and try these different ideas out. I am much more confident about my ideas now and the direction my work is heading in.

Context Project Development

For my context project, I made a more polished storyboard to present my idea to my tutor and the group critique.


I also completed this diaply brainstorm aswell to try out ideas of how I would display my video. Aswell as thinking of some other mechanical/electrical objects that could malfunction to make my video longer perhaps or more diverse.
My tutor and the group said they liked the idea but thought it could use more development. My tutor also said I could contrast some objects that were malfunctioning with objects that weren't doing anything. Then the viewers could assume they were broken, or it could be suspensful where they are waiting for it to do something that portrays it as being broken. It was suggested that I could perhaps look at other mediums to convey my idea. I had also said that I was finding it hard to incorporate drawing and painting into any of my projects, which is a medium that I enjoy the most, so they suggested maybe using that instead of a video. My tutor also gave me an idea to have images or video on a screen and have slightly differnt audio to what the viewer is seeing. I have also thought about drawing some of the objects I have chosen and then having some sort of audio with those drawings instead of photographs or video.

I will be trying these ideas out as soon as possible and thinking of more diverse ways to put forward my idea.

Display Project Development

I had done alot of research for this project but was a little stuck for ideas. I had also forgotten about it a little as I was preoccupied with the other three projects. But the weekend before the group crit I knuckled down and had a good think about what wanted to do. I made this brainstorm of sorts to try and show off my ideas for the group crit.

I thought about doing something physical, like a sculpture, to display some sort of information. But I was a little unsure as to what information I should display. I thought about using the theme of music. Song count, artist count or word count and using something small to represent the values, like foam dots stacked up to form a sort of bar chart. But then I decided to head in a more graphic direction. I had an idea where I could alphabetize all the words in a song and then stack them up to show the frequency of each word and it would look sort of like a bar chart. It would also be quite ambiguous, as in it would be hard to see what the text was from when it was organised in this way.
Below is the first try out of this idea.

I printed out the lyrics and then cut out each stack of words and stuck them onto a straight line. It was quite time consuming so I only did about a third of the song. It also didn't look very polished, so I thought stacking the words up and arranging them on the computer, then printing them out as a graph would look better.
I tried printing them on different positions on the page, and also arranging them in a long strip and grouping them together in differnt ways.

Printed along the middle of the page and arranged in a strip.
Printed along the bottom of the page and arranged in a strip.

Printed on the bottom of the page and arranged in a column, also spaced quite far apart.
Printed on the bottom of the page, arranged in a column and spaced closer together.

Printed along the bottom of the page and arranged in two strips.
Printed on the bottom of the page and arranged in a long strip.

I did try to print it out on one long strip of paper but my computer and printer refused to co-operate. So I ended up printing it on separate pieces of paper. But this sort of helped when I was tried out different arrangements. I used two different songs. A short song with some repetition and a much longer one with a lot more repetition. I think when I present it, it might be best to display the name and artist of the song, so people get a vague idea of what the piece is. I also plan to display a series of songs, maybe 4 or 6 and they will be from different genres of music to contrast between well-written songs and pop song generated purely for commercial success.

So I will now be investigating other possible songs and ways to display the final piece.

Rearrange Magazine Development

I tried out some more ideas for this project. I drew alot of inspiration from the artist research I
had done. (There were lots more than this but I chose these as what I thought were the better ones.)


I also completed a brainstorm sheet for display ideas. I tried to thing of way to display them that would remove them from their magazine context, but also thought about re-printing them as a zine/book to put them back into their original context.


After a group crit and thorough discussion with my tutor I am going to try and incorporate cutting through the image to reveal text, and also some drawing/painting work to make the pieces more diverse and interesting. But I still need to think of an idea or meaning to base my work on. My tutor recommended combining projects so perhaps I could bring the themes from my other three projects into this piece to give it more direction and significance.

Wednesday, 2 November 2011

S M L XL Research

I planned to get some library books for this project to do with scale and also containment. But I couldn't really find anything. Even the book which the project is based on is about architecture and it just didn't look like it was going to be of any use to me. So I thought I'd look for some books on glass sculpture, pretty much another dead end. So I settled for a very large general sculpture book and found some fairly useful artists that I can study and draw inspiration from.


Matthew Monahan


The book didn't have a description for any of the works, but from what I can see this work does relate to mine. Some aspects of it are contained in various glass structures and other pieces are not. This makes some of the pieces feel more precious than others. I really like this work because it combines lots of different materials into to single compositions. I may draw inspiration from this in that I could get sheet glass or Plexiglas and glue it into shapes to contain things instead of using bottles.

Sean Raspet http://www.seanraspet.org/

This work really interested me. It features glass cubes filled with various objects and then suspended in resin or a thick liquid. Now although contained in glass like the previous artist's work, this doesn't feel as precious and feels more like a frozen moment in time sealed in a box. I really like the effect that this creates and am considering incorporating this into my work.

Terence Koh http://www.asianpunkboy.com/


This artist has completed a variety of different works using well-known and some more obscure methods. In these two very similar pieces, various objects were put inside glass vitrines. This obviously fits with my theme of containment. In the first one, partial heads and faces were cast into lots of different materials and then put into the vitrines. Some of the glass was broken or taken out to add interest. In the second piece many random objects were painted completed white and then placed in the vitrines. In both pieces the glass boxes are arranged in a maze of sorts which must be navigated physically and by the eye in order to take in all the work has to offer. I really like these pieces, especially the scale of them. There is so much to look at and the objects are so detailed. Something on this scale would probably be too ambitious for me but I could still aim for it.


This work really jumped out at me as unique and innovative. It does deal with containment, but in an alternative way. Here the artist has taken various scrap or discarded materials and embeds them in white or black resin. He then cuts into the block to create interesting cross sections. In one piece these chunks are then arranged on a wall into one giant slab of resin and cross sections. In another a cube is cut out from the larger block, which also shows the cross sections of the scrap materials very effectively too. Although this is containment aswell, you do not get the same feeling that the objects inside are precious. They feel frozen in time but also the complete opposite of precious because they are basically destroyed in this process. By being glued and suspended in opaque resin and then sliced into pieces, it is now impossible to get back the original objects.

I also decided to have a general look around the Internet for some interesting pictures or ideas to do with glass bottles, containment and things like that to help me with some more direct inspiration for my project.


This artist puts all sorts of things in tiny bottles, not just ships.


I originally found this artist a few years ago but it wasn't very useful. I'm so glad I remembered it for this project.


This artist's work is very similar to the previous one. However, these terrariums are much more dry and arid. They feature cacti and sand rather than lush shrubs and dirt. This is a really nice idea, but because of the narrow necks of the bottles I currently have, this would be virtually impossible. Unless I switched to glass jars, or some other glass receptacle instead.

So, I'll hopefully be getting on with some ideas linked to this research I have done. I cleaned out the two bottles that I put those magazine pictures inside. I also get two more bottles, and made corks for two of them because they had screw tops. I think this makes them look a little more uniform, even though they are different shapes and obviously different sizes.


I'm also looking into perhaps getting some more bottles of different sizes, then I will have a wider choice and other bottles might look better together.